
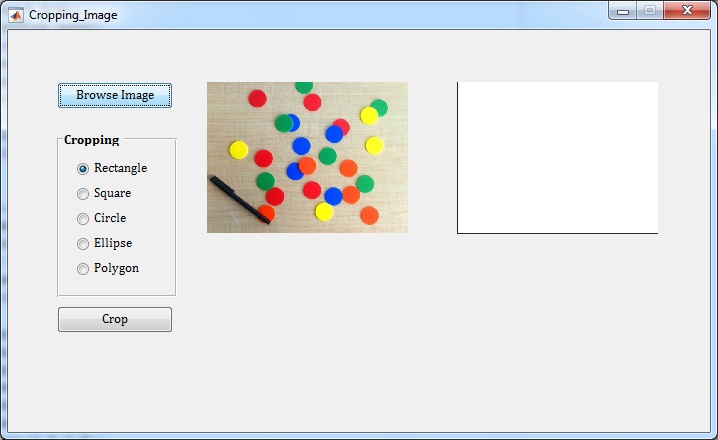
Region of Interest (ROI)
Dalam pengolahan citra, terkadang kita hanya menginginkan pengolahan hanya pada daerah/bagian tertentu dari citra. Daerah yang kita inginkan tersebut disebut dengan Region of Interest (ROI).
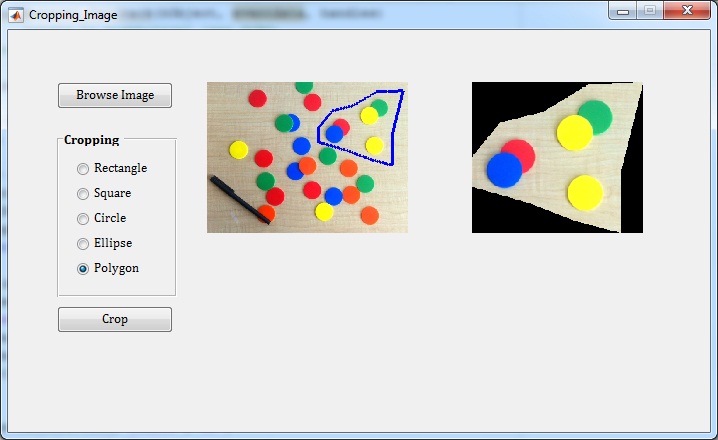
Proses untuk mendapatkan ROI salah satunya adalah dengan cara melakukan cropping pada suatu citra. Berikut ini merupakan contoh tampilan pemrograman GUI Matlab untuk meng-crop sebuah citra:
1. Citra Asli (Original Image)
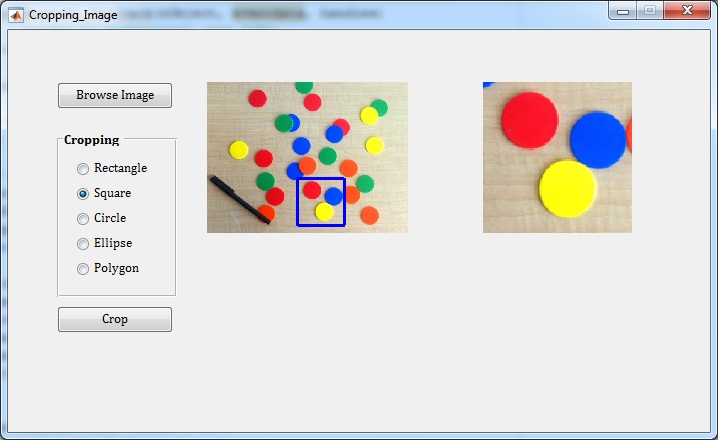
2. Rectangle Crop

3. Square Crop
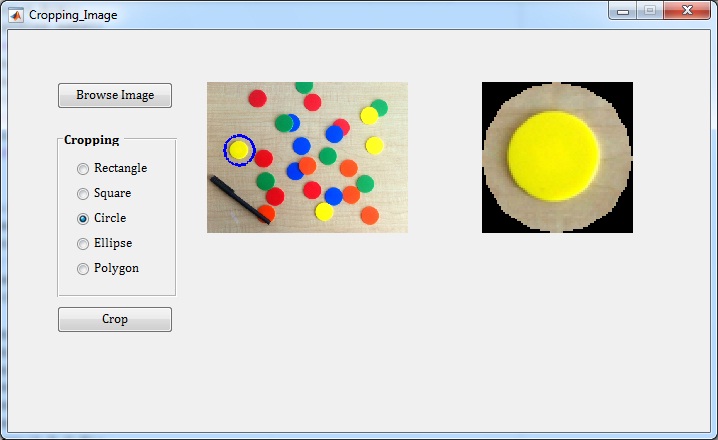
4. Circle Crop
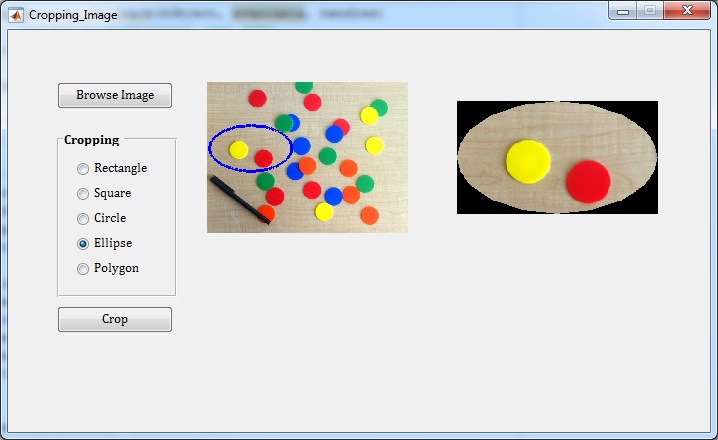
5. Ellipse Crop
6. Polygon Crop
File source code lengkap beserta citra untuk proses cropping pada materi di atas dapat diperoleh melalui halaman berikut ini: Source Code
Sedangkan tampilan source codenya adalah:
function varargout = Cropping_Image(varargin)
% CROPPING_IMAGE MATLAB code for Cropping_Image.fig
%      CROPPING_IMAGE, by itself, creates a new CROPPING_IMAGE or raises the existing
%      singleton*.
%
%      H = CROPPING_IMAGE returns the handle to a new CROPPING_IMAGE or the handle to
%      the existing singleton*.
%
%      CROPPING_IMAGE('CALLBACK',hObject,eventData,handles,...) calls the local
%      function named CALLBACK in CROPPING_IMAGE.M with the given input arguments.
%
%      CROPPING_IMAGE('Property','Value',...) creates a new CROPPING_IMAGE or raises the
%      existing singleton*.  Starting from the left, property value pairs are
%      applied to the GUI before Cropping_Image_OpeningFcn gets called.  An
%      unrecognized property name or invalid value makes property application
%      stop.  All inputs are passed to Cropping_Image_OpeningFcn via varargin.
%
%      *See GUI Options on GUIDE's Tools menu.  Choose "GUI allows only one
%      instance to run (singleton)".
%
% See also: GUIDE, GUIDATA, GUIHANDLES

% Edit the above text to modify the response to help Cropping_Image

% Last Modified by GUIDE v2.5 23-Aug-2015 21:39:16

% Begin initialization code - DO NOT EDIT
gui_Singleton = 1;
gui_State = struct('gui_Name',       mfilename, ...
    'gui_Singleton',  gui_Singleton, ...
    'gui_OpeningFcn', @Cropping_Image_OpeningFcn, ...
    'gui_OutputFcn',  @Cropping_Image_OutputFcn, ...
    'gui_LayoutFcn',  [] , ...
    'gui_Callback',   []);
if nargin && ischar(varargin{1})
    gui_State.gui_Callback = str2func(varargin{1});
end

if nargout
    [varargout{1:nargout}] = gui_mainfcn(gui_State, varargin{:});
else
    gui_mainfcn(gui_State, varargin{:});
end
% End initialization code - DO NOT EDIT


% --- Executes just before Cropping_Image is made visible.
function Cropping_Image_OpeningFcn(hObject, eventdata, handles, varargin)
% This function has no output args, see OutputFcn.
% hObject    handle to figure
% eventdata  reserved - to be defined in a future version of MATLAB
% handles    structure with handles and user data (see GUIDATA)
% varargin   command line arguments to Cropping_Image (see VARARGIN)

% Choose default command line output for Cropping_Image
handles.output = hObject;

% Update handles structure
guidata(hObject, handles);
movegui(hObject,'center');
clc;clear;

% UIWAIT makes Cropping_Image wait for user response (see UIRESUME)
% uiwait(handles.figure1);


% --- Outputs from this function are returned to the command line.
function varargout = Cropping_Image_OutputFcn(hObject, eventdata, handles)
% varargout  cell array for returning output args (see VARARGOUT);
% hObject    handle to figure
% eventdata  reserved - to be defined in a future version of MATLAB
% handles    structure with handles and user data (see GUIDATA)

% Get default command line output from handles structure
varargout{1} = handles.output;


% --- Executes on button press in pushbutton1.
function pushbutton1_Callback(hObject, eventdata, handles)
% hObject    handle to pushbutton1 (see GCBO)
% eventdata  reserved - to be defined in a future version of MATLAB
% handles    structure with handles and user data (see GUIDATA)
axes(handles.axes1)
cla reset
set(gca,'XTick',[])
set(gca,'YTick',[])

axes(handles.axes2)
cla reset
set(gca,'XTick',[])
set(gca,'YTick',[])

[filename,pathname] = uigetfile({'*.*'});

if isequal(filename,0)
    return
else
    Info = imfinfo(fullfile(pathname,filename));
    BitDepth = Info.BitDepth;
    if BitDepth == 1
        msgbox('Please insert RGB image or Grayscale image')
        return
    end
    Img = imread(fullfile(pathname,filename));
    axes(handles.axes1)
    cla reset
    set(gca,'XTick',[])
    set(gca,'YTick',[])
    imshow(Img)
end

set(handles.radiobutton1,'Enable','on')
set(handles.radiobutton2,'Enable','on')
set(handles.radiobutton3,'Enable','on')
set(handles.radiobutton4,'Enable','on')
set(handles.radiobutton5,'Enable','on')
set(handles.pushbutton2,'Enable','on')

handles.Img = Img;
handles.BitDepth = BitDepth;
guidata(hObject, handles)

% --- Executes on button press in radiobutton1.
function radiobutton1_Callback(hObject, eventdata, handles)
% hObject    handle to radiobutton1 (see GCBO)
% eventdata  reserved - to be defined in a future version of MATLAB
% handles    structure with handles and user data (see GUIDATA)

% Hint: get(hObject,'Value') returns toggle state of radiobutton1
set(handles.radiobutton1,'Value',1)
set(handles.radiobutton2,'Value',0)
set(handles.radiobutton3,'Value',0)
set(handles.radiobutton4,'Value',0)
set(handles.radiobutton5,'Value',0)

% --- Executes on button press in radiobutton2.
function radiobutton2_Callback(hObject, eventdata, handles)
% hObject    handle to radiobutton2 (see GCBO)
% eventdata  reserved - to be defined in a future version of MATLAB
% handles    structure with handles and user data (see GUIDATA)

% Hint: get(hObject,'Value') returns toggle state of radiobutton2
set(handles.radiobutton1,'Value',0)
set(handles.radiobutton2,'Value',1)
set(handles.radiobutton3,'Value',0)
set(handles.radiobutton4,'Value',0)
set(handles.radiobutton5,'Value',0)

% --- Executes on button press in radiobutton3.
function radiobutton3_Callback(hObject, eventdata, handles)
% hObject    handle to radiobutton3 (see GCBO)
% eventdata  reserved - to be defined in a future version of MATLAB
% handles    structure with handles and user data (see GUIDATA)

% Hint: get(hObject,'Value') returns toggle state of radiobutton3
set(handles.radiobutton1,'Value',0)
set(handles.radiobutton2,'Value',0)
set(handles.radiobutton3,'Value',1)
set(handles.radiobutton4,'Value',0)
set(handles.radiobutton5,'Value',0)

% --- Executes on button press in radiobutton4.
function radiobutton4_Callback(hObject, eventdata, handles)
% hObject    handle to radiobutton4 (see GCBO)
% eventdata  reserved - to be defined in a future version of MATLAB
% handles    structure with handles and user data (see GUIDATA)

% Hint: get(hObject,'Value') returns toggle state of radiobutton4
set(handles.radiobutton1,'Value',0)
set(handles.radiobutton2,'Value',0)
set(handles.radiobutton3,'Value',0)
set(handles.radiobutton4,'Value',1)
set(handles.radiobutton5,'Value',0)

% --- Executes on button press in radiobutton5.
function radiobutton5_Callback(hObject, eventdata, handles)
% hObject    handle to radiobutton5 (see GCBO)
% eventdata  reserved - to be defined in a future version of MATLAB
% handles    structure with handles and user data (see GUIDATA)

% Hint: get(hObject,'Value') returns toggle state of radiobutton5
set(handles.radiobutton1,'Value',0)
set(handles.radiobutton2,'Value',0)
set(handles.radiobutton3,'Value',0)
set(handles.radiobutton4,'Value',0)
set(handles.radiobutton5,'Value',1)

% --- Executes on button press in pushbutton2.
function pushbutton2_Callback(hObject, eventdata, handles)
% hObject    handle to pushbutton2 (see GCBO)
% eventdata  reserved - to be defined in a future version of MATLAB
% handles    structure with handles and user data (see GUIDATA)
Img = handles.Img;
[m,n,~] = size(Img);

val1 = get(handles.radiobutton1,'Value');
val2 = get(handles.radiobutton2,'Value');
val3 = get(handles.radiobutton3,'Value');
val4 = get(handles.radiobutton4,'Value');
val5 = get(handles.radiobutton5,'Value');

axes(handles.axes2)
cla reset
set(gca,'XTick',[])
set(gca,'YTick',[])

axes(handles.axes1)
cla reset
set(gca,'XTick',[])
set(gca,'YTick',[])
imshow(Img);

if val1 == 1
    h = imrect(gca,[n/2 m/2 0.2*n 0.2*m]);
    wait(h);
    mask = createMask(h);
elseif val2 == 1
    h = imrect(gca,[n/2 m/2 0.2*m 0.2*m]);
    setFixedAspectRatioMode(h,'true')
    wait(h);
    mask = createMask(h);
elseif val3 == 1
    h = imellipse(gca,[n/2 m/2 0.2*m 0.2*m]);
    setFixedAspectRatioMode(h,'true')
    wait(h);
    mask = createMask(h);
elseif val4 == 1
    h = imellipse(gca,[n/2 m/2 0.2*n 0.2*m]);
    wait(h);
    mask = createMask(h);
elseif val5 == 1
    h = impoly(gca);
    wait(h);
    mask = createMask(h);
end

[B,~] = bwboundaries(mask,'noholes');
for k = 1:length(B)
    boundary = B{k};
    axes(handles.axes1)
    cla reset
    set(gca,'XTick',[])
    set(gca,'YTick',[])
    imshow(Img);
    hold on
    plot(boundary(:,2), boundary(:,1), 'b', 'LineWidth', 2)
    hold off
end

if handles.BitDepth == 8
    Img(~mask) = 0;
    [row,col] = find(mask==1);
    h_Gray = imcrop(Img,[min(col) min(row) max(col)-min(col) max(row)-min(row)]);
    axes(handles.axes2)
    imshow(h_Gray);
else
    R = Img(:,:,1);
    G = Img(:,:,2);
    B = Img(:,:,3);
    R(~mask) = 0;
    G(~mask) = 0;
    B(~mask) = 0;
    RGB = cat(3,R,G,B);
    [row,col] = find(mask==1);
    h_RGB = imcrop(RGB,[min(col) min(row) max(col)-min(col) max(row)-min(row)]);
    axes(handles.axes2)
    imshow(h_RGB);
end


assalamulaikum, mas ini kan buat di gui ya, kalo misalkan mau buat ROI selector di m.file gitu gimana ya mas.
terimakasih
waalaikumsalam, bisa dipelajari perbedaan cara koding di m.file dan di GUI
Mas saya mau tanya, bagaimana cara menentukan centroid dari wilayah yg sudah di bounding box? Saya mendeteksi objek mata dan telah di bounding box, bagaimana menentukan centroid mata tsb? Thx
Bounding box biasanya didefinisikan dengan variabel [x,y,w,h] di mana x dan y merupakan koordinat titik pangkal bonding box sedangkan w dan h merupakan lebar dan tinggi nya
Koordinat centroid bisa didefinisikan sebagai (x+w/2,y+h/2)
Selamat pagi masi adi.. pada coding diatas
untuk menentukan koordinat dari daerah yang akan di crop caranya bagaimana ya mas?
selamat pagi
bisa langsung ditentukan koordinatnya yang ada pada fungsi imrect
mas, mau tanya. bagaimana cara menghilangkan background hitam yang ikut pada hasil citra cropping?
ekstensi file citra bisa diubah menjadi png
kalo untuk membuat hasil croppingnya sesuai dengan pola gimana ya mas? jadi tidak berbentuk kotak
Hasil croping bisa disimpan dengan ekstensi png agar tidak berbentuk kotak